When it comes to indulgent, effortless desserts, nothing captures the heart quite like the deep, caramelized flavor of Speculoos. These Mini Biscoff Cheesecakes are more than just a sweet treat; they are a multi-textured experience, layering a crunchy spiced foundation with a cloud-like mousse and a luxurious, glossy finish. If you have ever opened a jar of cookie butter and struggled to put the spoon down, this recipe was designed specifically for you.
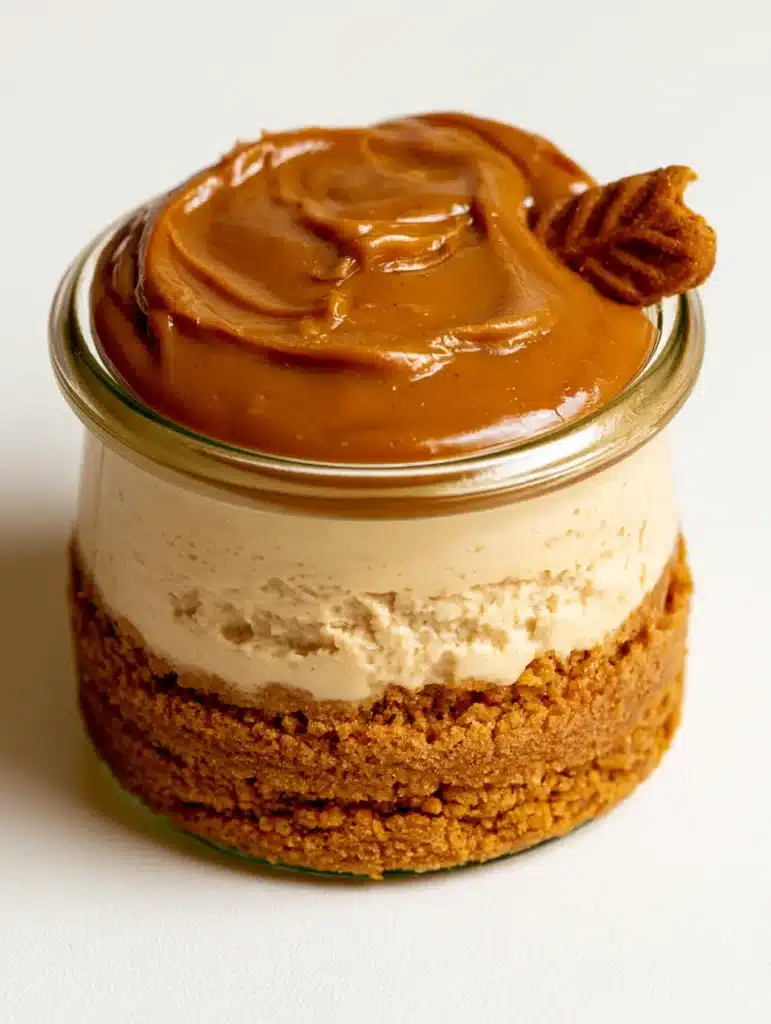
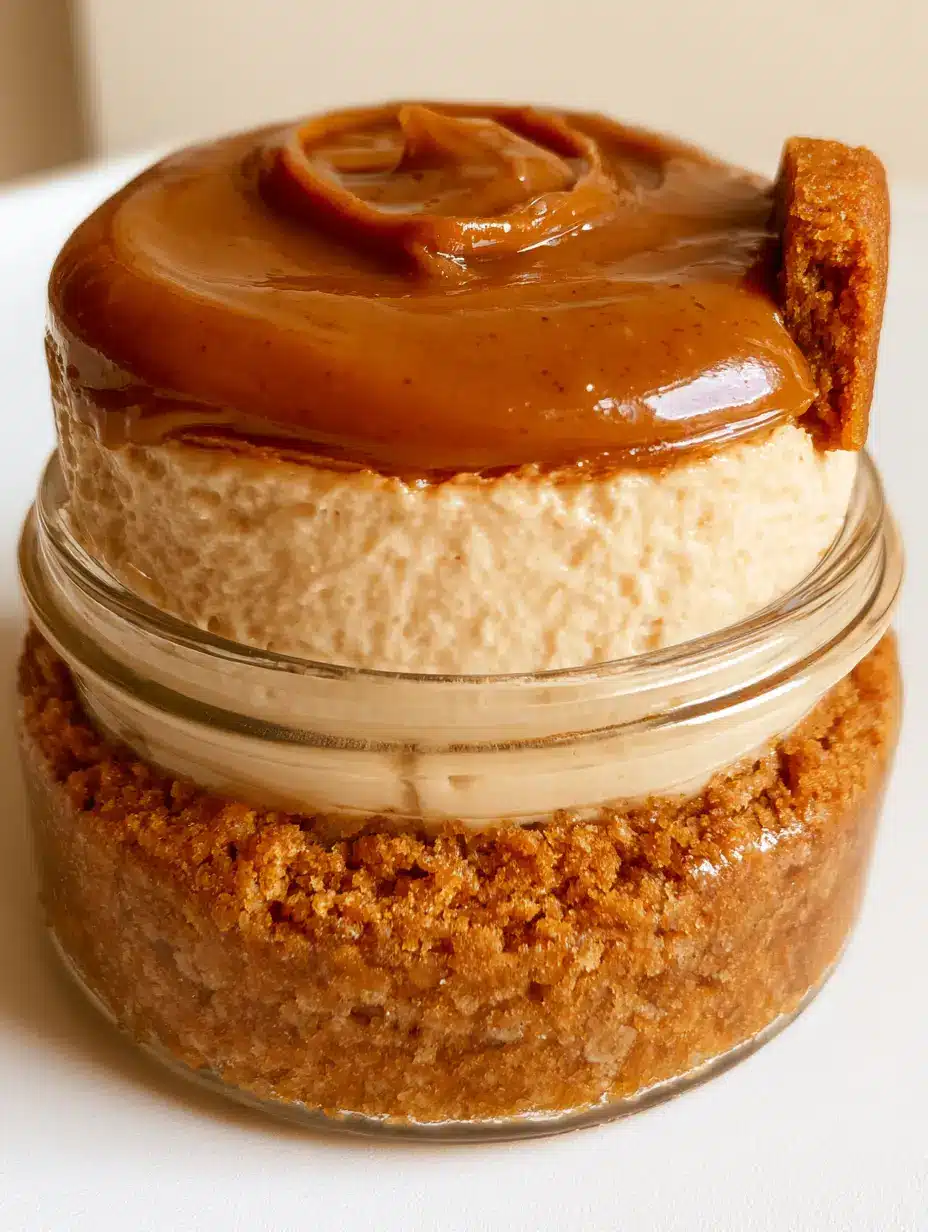
The beauty of these individual servings lies in their visual precision. Imagine a thick, golden-brown crust pressed firmly into the bottom of a clear glass jar, topped with a velvety beige cheesecake layer that balances the warmth of cinnamon with the tang of premium cream cheese. Finally, a mirror-smooth layer of melted Biscoff spread coats the top, providing a professional “bakery-style” finish that is as beautiful as it is delicious.
Why These Individual Cookie Butter Delights Are The Perfect Party Dessert
- No-Bake Simplicity: Achieve professional-grade results without ever turning on your oven, making these perfect for warm-weather gatherings or busy holiday schedules.
- Visual Sophistication: Serving these in clear glass jars showcases the distinct, clean layers of golden crust, light beige mousse, and mahogany glaze.
- Perfect Portion Control: Individual jars ensure every guest gets the perfect ratio of crust to filling without the mess of slicing a traditional cheesecake.
- Complex Flavor Profile: By utilizing both the cookies and the spread, we amplify the signature notes of brown sugar, ginger, and cloves found in authentic Biscoff.
The Essential Components for a Flawless Speculoos Experience
To achieve the specific “velvety light beige cheesecake mousse” described in our visual blueprint, we must select ingredients that offer both structural integrity and a delicate mouthfeel. Here is what you will need for your Mini Biscoff Cheesecakes.
Lotus Biscoff Cookies: You will need 8.8 oz (250g) of these iconic spiced biscuits. They serve as the crunchy base and the final garnish, providing that essential caramelized crunch.
Unsalted Butter: 5 tbsp (70g) of melted butter acts as the “glue” for your crust. Ensure it is unsalted to control the sodium levels, allowing the spices in the cookies to shine.
Full-Fat Cream Cheese: 16 oz (450g) of room-temperature cream cheese is non-negotiable. The high fat content is what provides the thick, creamy body required for a stable mousse.
Lotus Biscoff Spread: 1 cup (250g) for the filling and an additional 1/2 cup (125g) for the topping. This creamy spread is the soul of the recipe, infusing the cheesecake with its signature deep-brown sugar flavor.
Powdered Sugar: 1/2 cup (60g) provides just enough sweetness and helps stabilize the cream cheese without adding the graininess of granulated sugar.
Heavy Whipping Cream: 1 cup (240ml) of chilled cream is the secret to the mousse texture. When folded into the cream cheese, it introduces air bubbles that lighten the entire dessert.
Vanilla Extract and Salt: 1 tsp (5ml) of vanilla and a pinch of fine sea salt. These act as flavor enhancers, cutting through the richness and highlighting the warm spice notes.
The Professional Toolkit For Elegant Jar Desserts
To replicate the aesthetic of our visual blueprint—specifically the “thick, golden-brown crushed Biscoff cookie crust pressed firmly”—you will need a few specific tools. While a food processor is ideal for achieving a uniform crumb, a rolling pin and a sealed bag can work in a pinch.
You will also need 6 to 8 small clear glass jars (approximately 4-6 oz each). Using clear glass is essential for the “forensic visual accuracy” of the layers. A piping bag with a large round tip will help you transfer the cheesecake mousse into the jars without smearing the sides, keeping that “thick, velvety light beige” layer looking pristine. Finally, a small offset spatula is helpful for smoothing the melted Biscoff topping into a glossy, edge-to-edge finish.
Mastering the Layering Technique: Step-by-Step Instructions
Creating these Mini Biscoff Cheesecakes requires a focus on temperature and texture. Follow these steps to ensure your final result matches the handheld smartphone photo aesthetic of our blueprint.
Building the Compressed Spiced Foundation
Start by pulsing the Biscoff cookies in a food processor until they reach the consistency of fine sand. Pour in the melted butter and pulse again until the mixture looks like wet gold. You are looking for a sensory cue here: the mixture should hold its shape when pressed between your fingers.
Distribute the crumbs evenly among your jars. Use the back of a small spoon or a cocktail muddler to press the crust firmly into the bottom. A firmly packed crust is the key to that distinct “thick, golden-brown” layer that won’t crumble when the cheesecake is added. Place the jars in the freezer for 10 minutes to set while you prepare the filling.
Whipping the Velvety Light Beige Mousse
In a large mixing bowl, beat the softened cream cheese, 1 cup of Biscoff spread, and powdered sugar until completely smooth. Use a medium speed to avoid incorporating too much air at this stage; we want “thick and velvety,” not bubbly. Add the vanilla and salt, mixing until just combined.
In a separate chilled bowl, whip the heavy cream until stiff peaks form. The visual cue here is cream that stands straight up when the whisk is lifted. Gently fold the whipped cream into the Biscoff mixture using a silicone spatula. The color should transform into a beautiful “light beige.” Pipe this mixture into the jars, leaving about half an inch of space at the top for the glaze.
Achieving the Glossy Mirror Glaze Topping
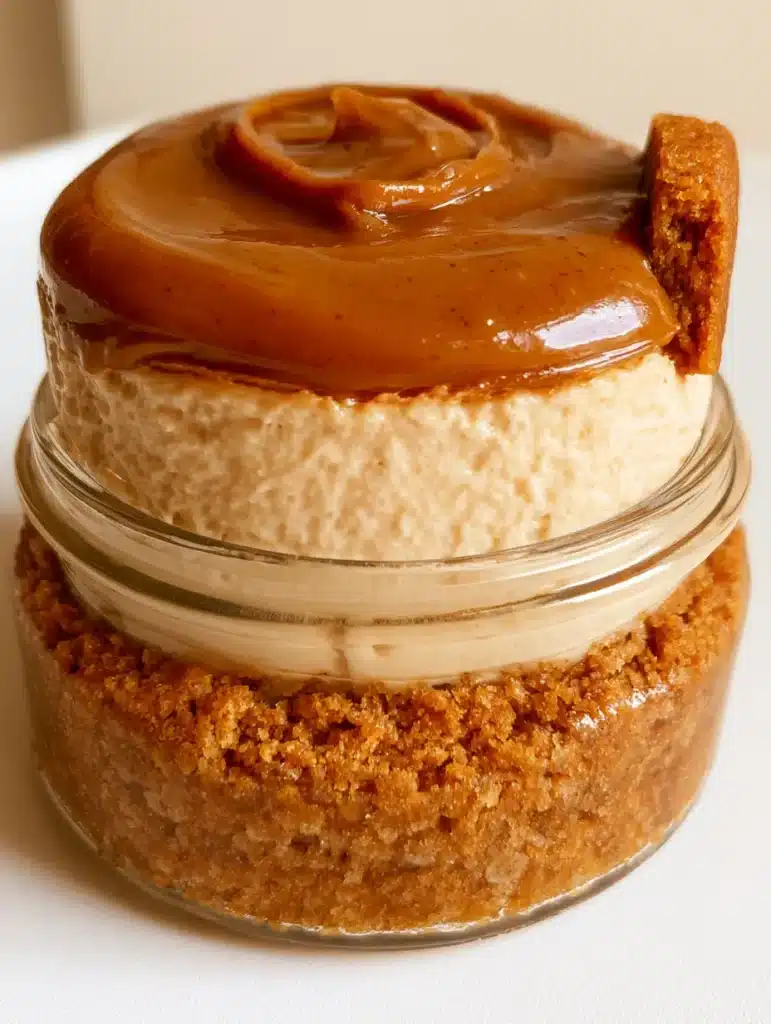
The final visual element is the “smooth, glossy layer of melted brown Biscoff cookie butter spread.” To achieve this, place 1/2 cup of Biscoff spread in a microwave-safe bowl. Heat in 15-second intervals, stirring in between, until it reaches a pourable, liquid consistency. It should be warm, but not hot to the touch.
Carefully pour about 1-2 tablespoons of the melted spread over the back of a spoon onto each cheesecake. This prevents the warm spread from “boring” a hole into the mousse. Tilt the jar in a circular motion to allow the spread to reach the edges. For the final touch, take a single Lotus Biscoff biscuit, break it into a small piece, and “tuck it into the side of the topping” as described in the prompt. Chill the jars for at least 2 hours before serving.
Expert Tips for Bakery-Quality Results
- Room Temperature Is Critical: Ensure your cream cheese is truly soft before mixing. If it is even slightly cold, you will end up with tiny white lumps in your “light beige mousse” that ruin the velvety aesthetic.
- Don’t Over-Microwave: Biscoff spread can burn easily. Melt it slowly until it is just fluid enough to pour. If it gets too hot, it will melt the cheesecake layer underneath.
- Use Chilled Cream: To get the stability required for these Mini Biscoff Cheesecakes, your heavy cream must be ice-cold. This ensures the fat molecules bond correctly to create air pockets.
- Clean Jar Sides: If you get filling on the side of the glass, use a Q-tip dipped in warm water to wipe it away before the topping goes on. This ensures your “forensic visual accuracy” is maintained.
Storage and Make-Ahead Advice
These dessert jars are incredible for entertaining because they actually improve with a little time in the fridge. The spices in the cookie base soften slightly into the mousse, creating a more cohesive flavor profile. You can store these Mini Biscoff Cheesecakes in the refrigerator for up to 4 days. Keep them tightly covered with plastic wrap or the jar’s lid to prevent them from absorbing other fridge odors.
While you can freeze these, the “glossy layer” of melted Biscoff may lose its shine upon thawing. If you must freeze them, do so without the garnish and the melted topping, adding those fresh before serving. They will last in the freezer for up to 2 months.
What To Serve With These Decadent Jars
Since these cheesecakes are rich and spiced, they pair beautifully with a variety of textures and flavors. If you are hosting a larger dessert bar, consider serving these alongside raspberry coconut magic bars to provide a fruity contrast to the deep caramel notes.
For a brunch-themed gathering, these jars make a surprising but welcome follow-up to a savory main like shrimp and crab biscuit melts. If you want to lean into the cookie butter theme for a morning event, try serving them as a “dessert course” after creme brulee french toast (coming soon).
Finally, if you want to go fully homemade, you can even use your own homemade Biscoff cookie butter for the filling to really impress your guests with your DIY skills.
Frequently Asked Questions
Yes, these are excellent for making ahead. They can be stored in the refrigerator for up to 4 days, and the flavor often develops more depth after the first 24 hours.
While Lotus Biscoff cookies provide the signature flavor, you can substitute with Graham crackers or ginger snaps if needed. However, the unique spiced profile will change.
Melt the spread in short intervals and pour it while it is still fluid. Once poured, immediately tilt the jar to let it spread naturally rather than using a spoon to push it.
The key is using completely room-temperature cream cheese. If the cream cheese is cold, it will not emulsify properly with the Biscoff spread, resulting in a grainy texture.
This is usually due to under-whipping the heavy cream or over-folding. Ensure your cream reaches stiff peaks and gently fold it in to maintain the air bubbles that provide structure.
The Complete Mini Biscoff Cheesecakes Recipe
Mini Biscoff Cheesecakes: The Ultimate No-Bake Cookie Butter Dessert Jars
Ingredients
Equipment
Instructions
- Pulse Biscoff cookies in a food processor until fine crumbs form. Mix with melted butter until it resembles wet sand.
- Press the mixture firmly into the bottom of 6 jars to create a thick, golden-brown crust. Chill in the freezer for 10 minutes.
- Beat softened cream cheese, Biscoff spread, powdered sugar, vanilla, and salt until smooth and velvety light beige.
- Whip heavy cream to stiff peaks and gently fold into the cheesecake base until light and airy.
- Transfer the mousse to a piping bag and fill the jars, leaving room for the topping.
- Melt the remaining Biscoff spread in the microwave and pour over the mousse. Tilt the jar for a smooth, glossy finish.
- Tuck a small piece of Biscoff cookie into the side of the topping and chill for at least 2 hours.
Notes
Whip the heavy cream until truly stiff peaks form for the best mousse texture.
Final Thoughts on the Ultimate Cookie Butter Treat
These Mini Biscoff Cheesecakes are a testament to how simple ingredients can be transformed into a high-end dessert with just a little bit of layering technique. From the crunch of the Biscoff base to the velvety mousse and the glossy cookie butter finish, every bite is a celebration of the unique Speculoos flavor. Whether you are making these for a special occasion or just a weeknight indulgence, they are sure to become a frequent request.
If you enjoyed this recipe, please leave a comment below and let me know how yours turned out! Don’t forget to share your photos and save this recipe to your dessert boards on Pinterest.