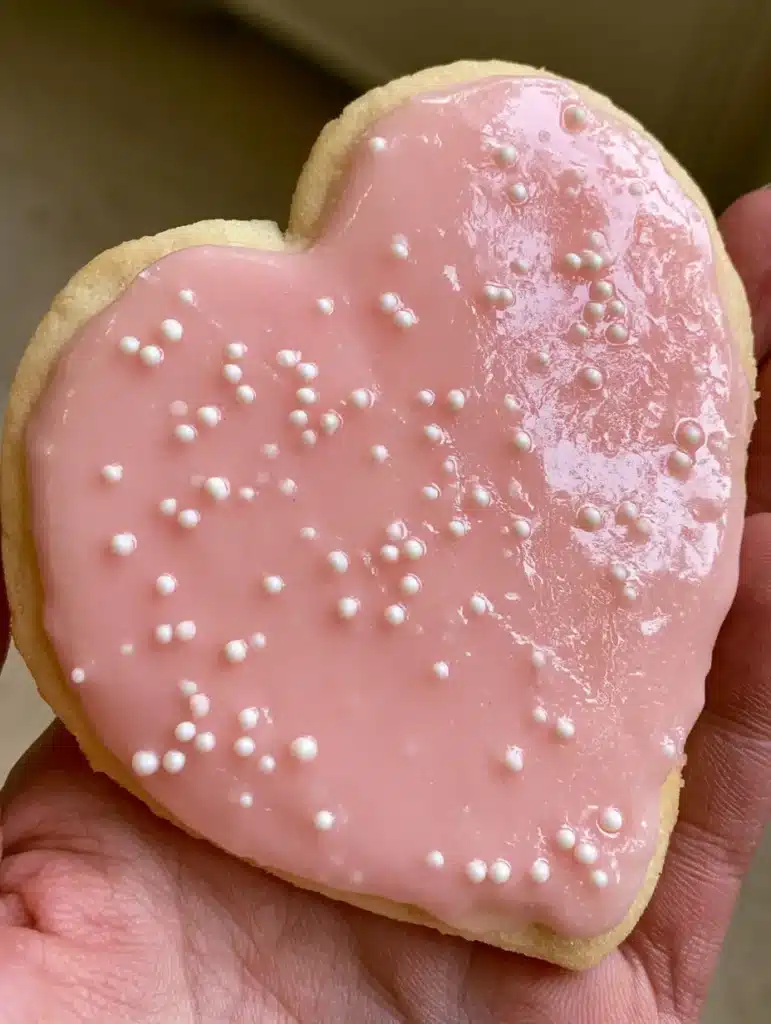
There is a specific magic in a perfectly decorated cookie that looks like it belongs in a high-end boutique bakery. You know the look: a thick, smooth, and highly glossy light blush pink icing that reflects the light with a stunning sheen. Achieving that professional finish at home often feels like a balancing act between flavor and structural integrity.
This Sugar Cookie Icing That Hardens is designed for home bakers who demand the visual perfection of royal icing without the rock-hard, chalky texture. By utilizing a specific ratio of corn syrup and clear extracts, we create a medium that flows effortlessly into every corner of your heart-shaped sugar cookies while setting into a durable, stackable surface.
Whether you are preparing a handheld smartphone-worthy treat for social media or a thoughtful gift for a loved one, this recipe ensures your white sugar pearl sprinkles stay perfectly in place. The result is a vibrant, blush-pink masterpiece that beautifully contrasts against the pale golden-brown edge of a perfectly baked cookie.
Why This Is the Only Glossy Icing Recipe You Need
- Unmatched Reflective Sheen: Unlike standard glaze, this recipe includes a culinary secret that ensures a mirror-like finish even after the icing has fully set.
- Stackable and Durable: Within 24 hours, this icing cures completely, allowing you to transport your cookies without worrying about smudges or dents.
- Forensic Visual Precision: The thickness of this icing is engineered to hold a clean edge, ensuring that the golden-brown baked cookie base remains visible as a framing element.
- Soft-Bite Consistency: While the surface hardens to a professional finish, the interior remains slightly soft, providing a pleasant eating experience compared to traditional egg-white royal icing.
The Anatomy of a Perfect High-Gloss Glaze
To achieve the specific visual described in our blueprint, we must select ingredients that offer both clarity and stability. Each component plays a vital role in the chemical structure of the icing.
Powdered Sugar (Confectioners’ Sugar): 4 cups (480g). This provides the bulk and structure; ensure it is finely sifted to prevent any unsightly bumps in your smooth finish.
Whole Milk or Heavy Cream: 2 to 3 tbsp (30-45ml). This acts as our liquid base, providing the necessary moisture to dissolve the sugar into a flowable state.
Light Corn Syrup: 2 tbsp (30ml). This is the “invisible” powerhouse ingredient responsible for the highly glossy light pink icing and the reflective sheen seen in professional photography.
Clear Vanilla Extract: 1 tsp (5ml). Using a clear extract is essential to maintain that pristine blush pink color without adding a brown or amber tint.
Gel Food Coloring: 1-2 drops of “Blush” or “Soft Pink”. Gel colors are concentrated, allowing you to achieve that delicate light pink hue without thinning out the icing’s consistency.
Pinch of Fine Salt: 1/8 tsp (0.75g). A tiny amount of salt cuts through the intense sweetness of the sugar, creating a more sophisticated flavor profile.
Essential Tools for Precision Decorating
Achieving a handheld smartphone-photo-quality cookie requires more than just a good recipe; it requires the right tools to manage the icing’s flow. You will need a large mixing bowl and a stiff silicone spatula for incorporating the sugar without whipping in too much air.
For application, high-quality piping bags or squeeze bottles are necessary to control the “flood” of the icing. If you are decorating lemon sugar cookies, a toothpick or scribe tool is indispensable for popping tiny air bubbles and dragging the icing into the sharp points of your heart-shaped cookies.

Mastering the 10-Second Consistency Rule
Achieving the Perfect Base Texture
The biggest challenge with Sugar Cookie Icing That Hardens is getting the thickness exactly right. You want a “flood” consistency that is thick enough to stay on the cookie but thin enough to level out into a smooth, reflective surface.
Start by mixing your sugar, milk, corn syrup, and extract until a thick paste forms. If the icing is too thick, add more milk 1/2 teaspoon at a time; if it is too thin, add more sifted powdered sugar 1 tablespoon at a time.
The Visual Test for Glossy Perfection
To test the consistency, lift your spatula and let the icing drizzle back into the bowl. It should take exactly 10 to 12 seconds for the trail of icing to disappear completely back into the surface. If it disappears faster, it is too thin and will run off the edges; if it takes longer, it won’t smooth out, leaving you with visible lines.
Executing the Heart-Shaped Design
Outlining and Flooding for Clean Edges
Place your heart-shaped cookie on a flat surface. Using a piping bag with a small round tip, start by outlining the perimeter of the heart, leaving about 1/8 inch (3mm) of the golden-brown cookie edge visible. This creates a “dam” that holds the rest of the icing in place.
Immediately fill in the center of the heart with more icing. Use your scribe tool or a toothpick to move the icing toward the outline, ensuring the surface is thick and even. This technique is what creates that “handheld smartphone photo” look where the icing appears plush and substantial.
Applying the White Sugar Pearl Sprinkles
Timing is critical when applying the white sugar pearl sprinkles. You must scatter them while the icing is still wet to ensure they sink slightly and adhere permanently. However, wait about 60 seconds after flooding so the icing has a moment to level out; this prevents the pearls from sinking too deep and disappearing.
Scatter the pearls evenly across the surface. The contrast of the white pearls against the smooth light pink glossy icing provides the tactile and visual texture that makes these cookies pop in natural daylight settings.
Expert Tips for a Professional Sheen
- Avoid Over-Mixing: Stir the icing slowly by hand. If you use a stand mixer or whisk too vigorously, you will incorporate air bubbles that will ruin the “highly glossy” finish.
- Use a Heat Lamp or Fan: To get the highest possible shine, place your decorated cookies under a desk lamp or near a gentle fan. Moving air helps the surface set quickly, which locks in the reflective sheen.
- Environmental Awareness: Humidity is the enemy of Sugar Cookie Icing That Hardens. If it is a rainy day, the icing may take twice as long to dry and might lose some of its gloss.
- Color Development: Pink gel colors tend to deepen as they dry. Always mix your icing one shade lighter than your target “blush pink” to account for this curing process.
What to Pair with Decorated Sugar Cookies
These heart-shaped treats are the perfect centerpiece for a dessert spread. If you are looking for a variety of textures, consider serving them alongside raspberry coconut magic bars for a tropical flair or even a bowl of cranberry mousse cups (coming soon) to complement the pink tones.
For those who prefer a savory-sweet balance, these cookies follow a meal of honey garlic shrimp and sausage (coming soon) beautifully. If you’re hosting a brunch, the glossy icing pairs wonderfully with a side of creme brulee french toast (coming soon).
Troubleshooting Common Icing Issues
Why did my icing lose its shine?
Dull icing is usually caused by high humidity or a lack of corn syrup. Ensure you aren’t skipping the syrup, as it is the primary ingredient that creates that reflective, glossy appearance described in the Midjourney prompt.
How do I fix air bubbles?
Small bubbles are inevitable. Keep a scribe tool or a clean sewing pin handy. As soon as you finish flooding a cookie, look at it under a bright light and pop any bubbles before the “skin” begins to form on the icing.
The corn syrup is responsible for the glossy reflective sheen. You can substitute with brown rice syrup, but the icing may not be as high-gloss.
No, because of the high sugar content and the small amount of milk, this icing is shelf-stable at room temperature once set.
Use the 10-second rule to ensure proper thickness and always pipe a border dam before flooding the center of your heart-shaped cookie.
While the surface will set within 1-2 hours, the icing requires a full 24 hours to cure completely for stacking and long-term storage.
This is usually caused by using regular vanilla extract. To maintain a pure blush pink color, you must use clear vanilla extract.
The Ultimate Sugar Cookie Icing That Hardens Recipe

Storing and Sharing Your Creations
Once your cookies have set for a full 24 hours, you can stack them between sheets of parchment paper in an airtight container. They will stay fresh at room temperature for up to 5 days. For longer storage, these cookies freeze exceptionally well; just ensure the icing is completely hard before placing them in a freezer-safe bag.
We would love to see your glossy, heart-shaped creations! If you found this guide helpful, please leave a comment below and share your photos with us. Don’t forget to save this recipe to your favorite boards on Pinterest so you can find it the next time you need a professional-grade finish for your holiday baking.